 |
| Basic compound miter saw cabinet without vac. |
Well, I have some cabinet grade plywood left from wall cabinet building, so why not a CMS, compound miter saw, cabinet with wings. Here are two designs I found on the web
http://mikefromwinton.com/mtrsaw.html
http://local.americanwoodworker.com/Mobile_Miter_Saw_Stand_Sun_City_Center_FL-r1332837-Sun_City_Center_FL.html
Since I have a small shop, Mike's smaller design seems best; however, I like the full wings on the other design. The first part of this project will be to build the basic cabinet, a design that could also be used for other tools, such as, the drill press, band saw, etc. The wings will be added later.
Specification:
- Same floor space as present metal stand, 24" x 20".
- Two fixed and two locking 3" casters
- Draw for tool accessories
- Internal duplex power outlet
- Extension arms both sides with fence, ruler, and stop.
- Removable saw platform to accommodate 10" and 12" fixed and sliding saws
- Built in vacuum/dust separator with autoswitch
Note: See post on dust separators
 |
| Tool cabinet carcass |
 |
| Assembled base cabinet showing casters and draw slide. |
 |
| View of cabinet top and platform rails. |
 |
| One of four 1/4" threaded insert for mounting platform. |
 |
| Electric outlet positioned for use with autoswitch. |
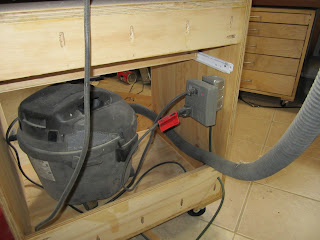 |
| Back view showing vac and Sears auto-switch |
The drawer design comes from Lowes Creative Ideas, BLOG, woodworking, titled, "Simplified Drawer Construction".
http://www.lowescreativeideas.com/Community/lciblog.aspx?BlogCatID=a55f3c08-e173-491e-9b33-7ab76699c136
Bill of Materials: Base Cabinet
- 2 pieces 20" x 28", sides
- 2 pieces 20" x 24", top and bottom
- 1 piece 20" x 23 15/16", platform
- 1 piece 20" x 3 1/2", top cleat
- 1 piece 20" x 5 1/2", bottom cleat
- 2 pieces 20" x 1 1/2", platform standoff
- 1 piece 24" x 2", front cleat
- 4 pieces 4 1/2" x 3", caster plates
- 1 piece 5 in x 3 ft poplar 1/2" plank for edging
- 2 pieces 22 1/16" x 3 3/4", 1/2" birch plywood, drawer front/back
- 2 pieces 16" x 4", 1/2" birch plywood, drawer sides
- 1 piece 22 1/2" x 16", 1/4" plywood, draw bottom
- 1 piece 4" x 23 3/4", 3/4 plywood, draw front
- 100 Kreg 1 1/4" course pocket screws
- 1 set 500mm Euro drawer slide, KV 1284 (Lowes)
- 2 3" casters fixed, HF
- 2 3" caster, swivel/locking, HF
- 4 1/4-20 threaded insert, McMaster 92105A200, ( note 3 )
- 1 15 ft extension cord
- 1 Electrical box with duplex plate
- 1 Duplex outlet
Step by Step Construction of Basic Cabinet
- Cut out the sides, bottom, top and cleats, (see note 1)
- Drill pocket holes on the underside of the top and bottom pieces
- Drill pocket holes in both cleats
- Using glue, assemble cabinet carcass, (see note 2)
- Glue and clamp front cleat under top at front
- Glue caster plates in place
- Glue platform standoff to top, see picture
- Cut platform to size, round over and sand
- Drill 1/4" holes 3/4" in from corners
- Place platform in place on standoffs and transfer 1/4" holes to standoff
- Drill standoff holes to 21/64", 7/8" deep
- Cut 1/2" poplar plank into 3/4" strips
- Using glue and brads add poplar strips to front edge of cabinet
- Cut 1/2" poplar 24" x 2 3/4" and glue to front cleat.
- Sand cabinet and round edges with 1/8" router round over bit.
- Seal cabinet with Bullseye Sealcoat
- Install 1/4-20 threaded inserts in standoffs, put instant glue on threads first.
- Mount casters with 5/16" x 1" lag screws, left side fixed right side swivel
- Mount electrical outlet
- Mount drawer slides, 4 1/4" below front cleat
 |
| Draw at full extension. |
Step By Step Construction of Drawer - See Lowes Creative Ideas blog, "Simplified Drawer Construction"
- Build a drawer using this method, 16" x 23" x 4"
- Cut drawer front from 3/4" plywood
- Edge drawer front with 1/2" poplar
- Sand round and seal
- Mount drawer front to drawer, centered left to right with 1/4" lip at bottom
- Attach drawer using #10 x 1" screws from inside drawer
Step By Step Construction of Wings


